HID attacks using an Android Phone
When the Kali Nethunter was first in 2014, I was interested in testing out the HID attacks that they showed off in the initial presentation but, at the time I was didn’t have any of the devices that they officially supported and porting the release was not something I could conceivable do with my skill set. So that left me we with the only option to read the code for the Nethunter App.
Dissection
Upon reading the code, I realised the Nethunter app would(at that time):
- Startup a chroot environment
- Copy some binaries from the Asset Manager
- The binary would take a script as an argument and start sending keystrokes from the Linux HID gadget
Key takeaways
- The App requires superuser permissions to interact with the HID gadget.
- The Linux kernel needs to either have the HID-gadget Kernel patch for older kernel versions(<3.19) or use the ConfigFS system to enable the HID gadget.
- Early on into the reading, I realised that the nethunter scripts are running in a chroot environment is useful for the other types of exploits that the nethunter team wanted to do, but as I was interested only in the HID attacks, the chroot environment could be removed.
- The Android system doesn’t allow you to have arbitrary files in the Apk and they have to be copied over to the App data directory (
/data/data/com.draguve.droidducky/) before they can be executed.
Testing the Gadget
After compiling a kernel with the HID gadget enabled for my device the testing could start. Thankfully the Linux developers provide us with an example on how to interface with the /dev/hidg0 character devices.
The hid-gadget-test utility takes data from the standard input To use, point it at a hidg device and set the device type (keyboard/mouse/joystick).In keyboard mode, you can send up to six values.
./hid_gadget_test /dev/hidg0 keyboard
This allows us to send keystrokes to the computer connected to the phone
su
chmod 666 /dev/hidg0 /dev/hidg1
echo a | ./hid-gadget-test /dev/hidg0 keyboard
In the example, the sample code takes in characters that are provided with the standard input and the command line arguments and then generates a keyboard report that gets written to /dev/hidg0
  int keyboard_fill_report(char report[8], char buf[BUF_LEN], int *hold)
  {
	char *tok = strtok(buf, " ");
	int key = 0;
	int i = 0;

	for (; tok != NULL; tok = strtok(NULL, " ")) {

		if (strcmp(tok, "--quit") == 0)
			return -1;

		if (strcmp(tok, "--hold") == 0) {
			*hold = 1;
			continue;
		}

		if (key < 6) {
			for (i = 0; kval[i].opt != NULL; i++)
				if (strcmp(tok, kval[i].opt) == 0) {
					report[2 + key++] = kval[i].val;
					break;
				}
			if (kval[i].opt != NULL)
				continue;
		}

		if (key < 6)
			if (islower(tok[0])) {
				report[2 + key++] = (tok[0] - ('a' - 0x04));
				continue;
			}

		for (i = 0; kmod[i].opt != NULL; i++)
			if (strcmp(tok, kmod[i].opt) == 0) {
				report[0] = report[0] | kmod[i].val;
				break;
			}
		if (kmod[i].opt != NULL)
			continue;

		if (key < 6)
			fprintf(stderr, "unknown option: %s\n", tok);
	}
	return 8;
  }
This could later be implemented as native function to avoid depending on the binary to be bundled with the android apk
Developing The App
As the app required superuser permissions the first step was to import the libsu library by topjohnwu it provides us with an easy API to access the Unix Shell.
We store the hid-gadget-test binary in the Assets of our app and then copy it over to the data directory to get execution permissions when the app is launched.
public void assetsToFiles(String TARGET_BASE_PATH, String path, String copyType) {
        AssetManager assetManager = getApplicationContext().getAssets();
        String assets[];
        try {
            // Log.i("tag", "assetsTo" + copyType +"() "+path);
            assets = assetManager.list(path);
            if (assets.length == 0) {
                copyFile(TARGET_BASE_PATH, path);
            } else {
                String fullPath = TARGET_BASE_PATH + "/" + path;
                // Log.i("tag", "path="+fullPath);
                File dir = new File(fullPath);
                if (!dir.exists() && pathIsAllowed(path, copyType)) { // copy thouse dirs
                    if (!dir.mkdirs()) {
                        Log.i("tag", "could not create dir " + fullPath);
                    }
                }
                for (String asset : assets) {
                    String p;
                    if (path.equals("")) {
                        p = "";
                    } else {
                        p = path + "/";
                    }
                    if (pathIsAllowed(path, copyType)) {
                        assetsToFiles(TARGET_BASE_PATH, p + asset, copyType);
                    }
                }
            }
        } catch (IOException ex) {
            Log.e("tag", "I/O Exception", ex);
        }
    }
This allows libsu to run the binary to be executed from the data directory. Fortunately, the parser for Duckyscript is written in Java. We can copy-paste the code for our app. Which also allows us to use the same payloads that were created for the USB Rubber Ducky. This brings us to feature parity with the USB Rubber Ducky but, as our device is much more capable than the 60Mhz CPU in the Rubber Ducky, I wanted to have some upgrades over it.
Upgrades
Sending information back
As the HID attack is by definition a one-directional attack I wanted a way to extract back some information from the “victim”.Android devices also provide USB Tethering where in the Android device acts as a NIC for the host which seemed like the perfect vector to retrieve information. So using thenanohttpd library we can set up a local server which listens for any POST request on port 8080 and stores the responses. This allows us to serve huge files to which can be downloaded by the host/victim.
Scriping Language
Duckyscript is an easy language to write HID payload but, it’s limited in the feature set. So to alleviate this I thought I should implement a javascript runtime environment. J2V8 did the job perfectly. It allows us to bind Java functions to javascript ones allowing us to run them according to the javascript on runtime and it also allows us to use one of the thousands of libraries made for javascript in our HID exploits.
V8 runtime = V8.createV8Runtime();
KeyWriter writer = new KeyWriter();
V8Object ducky = new V8Object(runtime);
runtime.add("ducky", ducky);
ducky.registerJavaMethod(writer, "SendString", "SendString", new Class<?>[] { String.class });
ducky.registerJavaMethod(writer, "SendCommand", "SendCommand", new Class<?>[] { String.class });
ducky.registerJavaMethod(writer, "Log", "Log", new Class<?>[] { String.class });
ducky.registerJavaMethod(writer, "Delay", "Delay", new Class<?>[] { Integer.class });
ducky.registerJavaMethod(writer, "PrintIP", "PrintIP", new Class<?>[] { Boolean.class });
ducky.registerJavaMethod(writer, "WriteFile", "WriteFile", new Class<?>[] { String.class });
ducky.release();
Demo
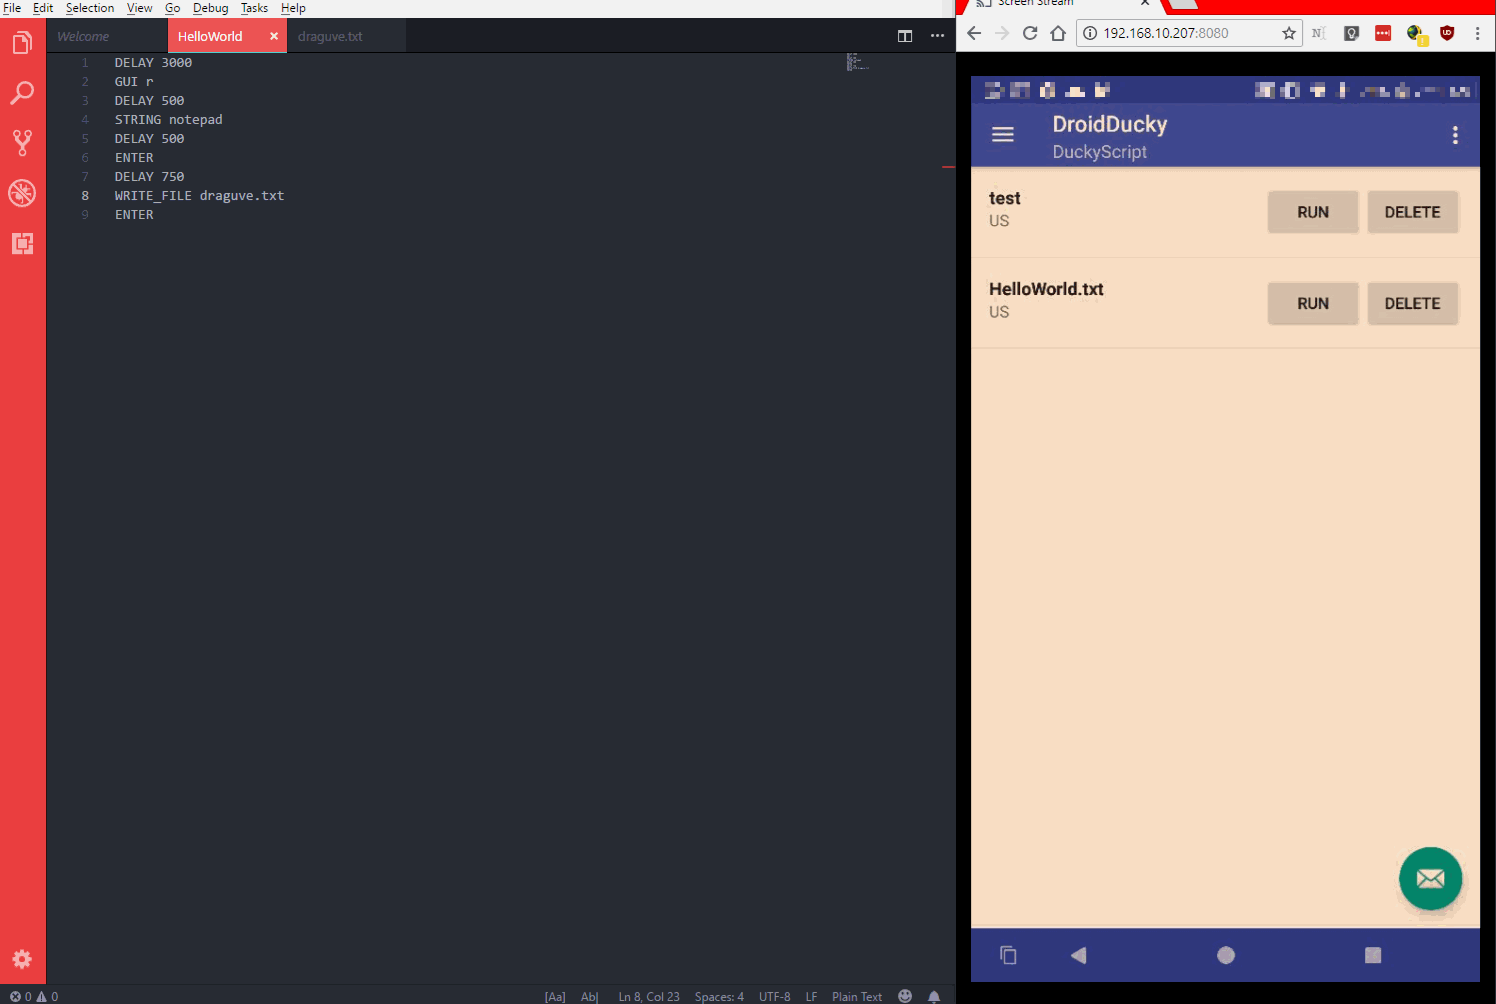
The code is available on GitHub
Future?
- Make a system to download and run premade payloads.
- Connect it to a password manager to make inputing passwords easier.
- Find a way to change the IP address settings of the RNDIS driver to allow attacks similar to Samy Kamkar’s PoisonTap.
- Make a native function using the Android NDK to remove the dependence on the ‘hid_gadget_test’ binary.
Ritwik Patil was born and raised in India. He did his Bachelor of Technology in Electronics and Computer Engineering at Thapar University and now he's a Software Engineer at Samsung.